使用公开 NuGet 包完成 C#、TensorRT 与 ResNet18 Top-5 分类
这篇文章完整演示如何获取 TorchVision ResNet18、转换为 ONNX、把模型暂存在 Git 仓库外、使用已发布的 TensorRtSharp4.0 与 OpenCV NuGet 包生成 C# 预处理 tensor、建立独立 ONNX Runtime 参考并执行真实 TensorRT 推理。最终结果不是模板日志,而是原图上的 Top-5 叠加图和同次运行输出的终端截图。
本文使用的项目与库
本文使用 TensorRtSharp4.0 仓库中的 samples/ComputerVision/01.Classification。这个样例负责图片预处理、TensorRT engine 构建与执行、Softmax、Top-K、结构化 JSON、独立参考比较和 SVG 结果图导出。
主要组件如下:
| 组件 | 本文中的职责 |
|---|---|
JYPPX.TensorRtSharp |
解析 ONNX、构建 engine、绑定 tensor 并执行推理 |
JYPPX.CudaSharp |
提供 CUDA 设备、内存和 stream 基础能力 |
samples/ComputerVision/01.Classification |
完成图片预处理、Softmax、Top-5、结果 JSON 和可视化 |
JYPPX.TensorRT.CSharp.API 4 系列包 |
提供已发布的 TensorRT 与 CUDA managed API |
JYPPX.OpenCV.CSharp.API |
由项目作者维护,负责 JPEG/PNG/BMP 图片解码 |
TorchVision v0.25.0 |
提供 ResNet18 网络定义、权重和 ImageNet-1K 标签 |
| ONNX Runtime CPU | 对同一个 C# float32 输入 tensor 生成独立参考 |
TensorRT 10.11 |
本文实际运行使用的推理后端 |
运行前需要安装 .NET 8 SDK、与本机 GPU 匹配的 CUDA 和 TensorRT,并按仓库构建说明生成 jyppxtrtbridge.dll。CUDA、cuDNN、TensorRT 和 NVRTC 都由用户自行安装,不进入源码包、NuGet 包或 GitHub Release。
模型获取与许可证
本文固定使用 TorchVision ResNet18 IMAGENET1K_V1:
- 权重地址:
https://download.pytorch.org/models/resnet18-f37072fd.pth - TorchVision tag:
v0.25.0 - 固定 commit:
8ac84ee75afb1c327902156b5336f56ad63b7e2f - 权重 SHA256:
f37072fd47e89c5e827621c5baffa7500819f7896bbacec160b1a16c560e07ec - TorchVision 源码许可证:BSD-3-Clause
仓库提供固定来源和哈希校验的获取入口:
pwsh -NoProfile -ExecutionPolicy Bypass `
  -File ./eng/Acquire-TorchVisionResNet18OfficialAssets.ps1 `
  -AllowDownload -ExportOnnx -PythonPath python
测试图片使用 Wikimedia Commons 上的 Dog at Norre Vorupor Strand:
- 说明页:
https://commons.wikimedia.org/wiki/File:Dog_at_N%C3%B8rre_Vorup%C3%B8r_Strand.jpg - 下载地址:
https://upload.wikimedia.org/wikipedia/commons/thumb/0/0d/Dog_at_N%C3%B8rre_Vorup%C3%B8r_Strand.jpg/1280px-Dog_at_N%C3%B8rre_Vorup%C3%B8r_Strand.jpg - 许可证:CC0 1.0
- 本文下载文件 SHA256:
e678ecf8dab63da112812ada0553d72d46033e4e9ea3b568bf0e53d92e1d6910
模型权重只用于本地转换和验证,当前没有模型再分发授权,因此不得提交到 Git、上传 GitHub Packages 或附加到 Release。CC0 图片允许公开再分发,文章中的结果图可以保留原图。
ONNX 转换与暂存
获取脚本内部使用下面的固定转换命令。这里保留完整命令,便于不使用 PowerShell 获取器时复现:
python eng/Export-ClassificationResNet18Onnx.py --weights <downloads>/resnet18-f37072fd.pth --onnx <models>/resnet18-imagenet1k-v1.onnx --labels <models>/imagenet1k.names --report <models>/resnet18-onnx-export.json
转换环境为 PyTorch 2.10.0+cpu、TorchVision 0.25.0+cpu、ONNX opset 17。转换后的模型统一暂存在仓库外的:
models/Classification/resnet18-torchvision-v0.25.0/resnet18-imagenet1k-v1.onnx
固定 ONNX 长度为 46,748,553 bytes,SHA256 为:
ead3558569edd88aa73a4eb46acbe6c38dee113933234547f04a0f6e48169903
模型合同是 images:float32[1,3,224,224] -> logits:float32[1,1000]。输入采用 RGB、NCHW、短边缩放到 256、中心裁剪 224 x 224、scale 1/255、ImageNet mean/std;输出 logits 再执行 Softmax 和稳定 Top-5 排序。
使用公开包准备案例
samples/ComputerVision/01.Classification 是可执行案例,不是 NuGet 库。项目设置为 IsPackable=false,
通过仓库共享 props 引用公开的 JYPPX.TensorRT.CSharp.API 4 系列包以及
OpenCV-CSharp-API。它不引用 src 下的 TensorRT/CUDA 项目,
也不存在 JYPPX.TensorRT.CSharp.API.Classification 这个待发布案例包。
在仓库外创建自己的项目时,可以不写死具体版本:
dotnet add package JYPPX.TensorRT.CSharp.API --version "4.0.0-*"
dotnet add package JYPPX.OpenCV.CSharp.API --prerelease
dotnet add package JYPPX.OpenCV.runtime.win-x64 --prerelease
dotnet add package JYPPX.TensorRT.CSharp.API.Runtime.win-x64.trt10.11.cuda12.9.cudnn9.22.Bridge --version "4.0.0-*"
最后一个包 ID 必须按本机环境选择。它只包含项目自有 bridge;CUDA、cuDNN 和 TensorRT 继续从用户安装目录加载。
先定义工作目录,正文后续命令都使用变量,避免绑定某台机器的盘符:
$RepoRoot = (Resolve-Path .).Path
$WorkspaceRoot = Split-Path -Parent $RepoRoot
$ModelRoot = Join-Path $WorkspaceRoot 'models/Classification/resnet18-torchvision-v0.25.0'
$CaseRoot = Join-Path $WorkspaceRoot 'downloads/article-assets/classification-resnet18'
$ImageJpeg = Join-Path $CaseRoot 'dog.jpg'
$ImageBmp = Join-Path $CaseRoot 'dog.bmp'
New-Item -ItemType Directory -Force -Path $CaseRoot | Out-Null
下载 CC0 图片。案例使用 JYPPX.OpenCV.CSharp.API 直接解码 JPEG,不再要求为了运行案例额外转成 BMP:
Invoke-WebRequest `
  'https://upload.wikimedia.org/wikipedia/commons/thumb/0/0d/Dog_at_N%C3%B8rre_Vorup%C3%B8r_Strand.jpg/1280px-Dog_at_N%C3%B8rre_Vorup%C3%B8r_Strand.jpg' `
  -OutFile $ImageJpeg
编写程序入口
案例入口把命令参数交给 ClassificationCommand.Run(string[]),命令参数和退出码保持稳定:
TensorRtEnvironmentSnapshot snapshot = TensorRtEnvironmentProbe.GetCurrent();
Console.WriteLine($"BridgeTensorRt={snapshot.BuildInfo.TensorRtVersion}");
return ClassificationCommand.Run(args);
命令执行器内部主流程可以概括为下面五步:
ClassificationImagePreprocessResult? preprocess = TryPreprocessImage(args);
OnnxSampleResult result = TensorRtOnnxSample.RunSingleFloatInputOutput(options);

float[] probabilities = ClassificationOutputProcessor.Transform(
    result.OutputValues,
    ClassificationScoreTransform.Softmax);
IReadOnlyList<ClassificationPrediction> top5 =
    ClassificationOutputProcessor.GetTopK(probabilities, labels, 5);

ClassificationOutputReportWriter.Write(
    outputJsonPath, options, result, preprocess, labelsPath, labelsSha256,
    labels.Count, transform, probabilities, top5, referenceContext, validation);

ClassificationVisualizationWriter.Write(
    visualizationPath, visualizationBackgroundPath, preprocess!, top5);
图片预处理结果会保存 source/tensor SHA256 和完整语义合同。可视化写入器只接受与预处理源图同尺寸的 JPEG、PNG 或 BMP 背景;尺寸不一致、没有真实图片输入或 Top-K 为空都会直接失败,防止把结果贴到错误图片上。
编译并运行
先还原并检查依赖图,然后编译案例。这里不会打包或发布案例项目:
dotnet restore ./samples/ComputerVision/01.Classification/Classification.csproj
dotnet list ./samples/ComputerVision/01.Classification/Classification.csproj package
dotnet build ./samples/ComputerVision/01.Classification/Classification.csproj -c Release --no-restore
本文实测环境选择 win-x64-trt10.11-cuda12.9-cudnn9.22 bridge。设置本机 TensorRT 根目录;
CUDA 和 cuDNN 由运行时根目录解析器按运行时键检查:
$env:TENSORRT_PATH = '<TensorRT-root>'
运行使用公开包构建的仓库案例,并让 C# 写出权威预处理 tensor,以便独立框架使用完全相同的输入:
$InputTensor = Join-Path $CaseRoot 'classification-input.fp32.bin'
$OutputJson = Join-Path $CaseRoot 'classification-output.json'
$Visualization = Join-Path $CaseRoot 'classification-result.svg'

dotnet run --project ./samples/ComputerVision/01.Classification -c Release --no-build -- `
  --model (Join-Path $ModelRoot 'resnet18-imagenet1k-v1.onnx') `
  --labels (Join-Path $ModelRoot 'imagenet1k.names') `
  --image $ImageJpeg --preprocessed-output $InputTensor `
  --input-shape 1x3x224x224 --tensor-rt-line 10 `
  --image-resize shorter-side-center-crop --resize-shorter-side 256 `
  --tensor-layout NCHW --color-order RGB --scale 0.00392156862745098 `
  --mean 0.485,0.456,0.406 --std 0.229,0.224,0.225 `
  --score-transform softmax --top-k 5 --noTF32 `
  --output-json $OutputJson --visualization $Visualization `
  --visualization-background $ImageJpeg
为这个精确 tensor 生成独立参考:
$InputSha = (Get-FileHash $InputTensor -Algorithm SHA256).Hash.ToLowerInvariant()
$ReferenceRoot = Join-Path $CaseRoot 'reference'

python ./eng/Invoke-ClassificationResNet18Reference.py `
  --weights (Join-Path $WorkspaceRoot 'downloads/resnet18-torchvision-v0.25.0/source/resnet18-f37072fd.pth') `
  --onnx (Join-Path $ModelRoot 'resnet18-imagenet1k-v1.onnx') `
  --labels (Join-Path $ModelRoot 'imagenet1k.names') `
  --input-tensor $InputTensor --output-directory $ReferenceRoot `
  --expected-input-sha256 $InputSha
生成独立参考后,使用同一条案例命令增加 --reference-output 重新运行,比较任务概率与原始 logits。
再复制参考 JSON,把索引 0 的参考值增加 0.125 后执行受控负例;进程必须返回非零,证明错误参考会失败关闭。
已验证结果
本文实跑环境为 Windows 11、NVIDIA GeForce RTX 3060 Laptop GPU、CUDA 12.9、TensorRT 10.11。24-bit BMP 和同图 PPM 得到的 C# 输入 tensor 完全一致,SHA256 为 43de394443f6fc3ccfd08cd9df61ee645ee5c51d1954c52267c221a438252f9e。
独立参考先比较 PyTorch 与 ONNX Runtime,1000 个 logits 的最大绝对误差为 1.049041748046875e-05,argmax 一致。TensorRT 再与 ONNX Runtime 比较:
| 项目 | 比较值数 | mismatch | 最大绝对误差 |
|---|---|---|---|
| Softmax 任务概率 | 1000 | 0 | 3.87e-7 |
| 原始 logits | 1000 | 0 | 6.68e-6 |
最终 Top-5 为:Tibetan terrier 0.309864、Dandie Dinmont 0.242565、Lhasa 0.124855、Shih-Tzu 0.119756、miniature poodle 0.044701。本次 TensorRT enqueue 记录为 3.063 ms,程序结束于 OutputValidated=True 和 Classification Passed=True。受控负例返回 exit 1、mismatch 1、firstMismatch 0,说明参考值错误时会失败关闭。
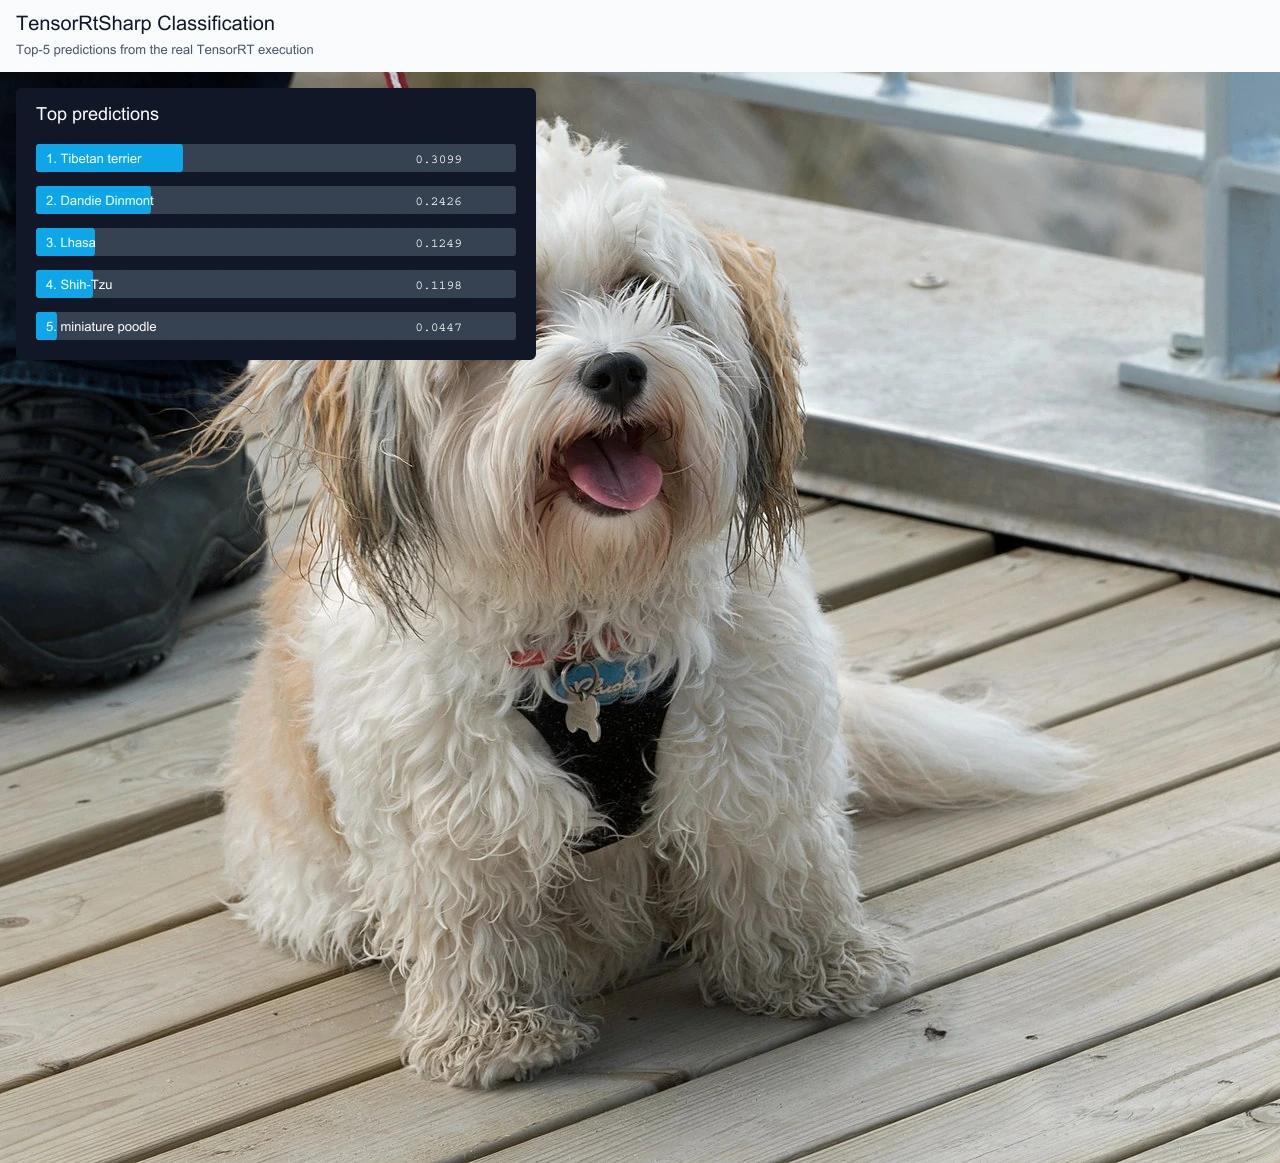
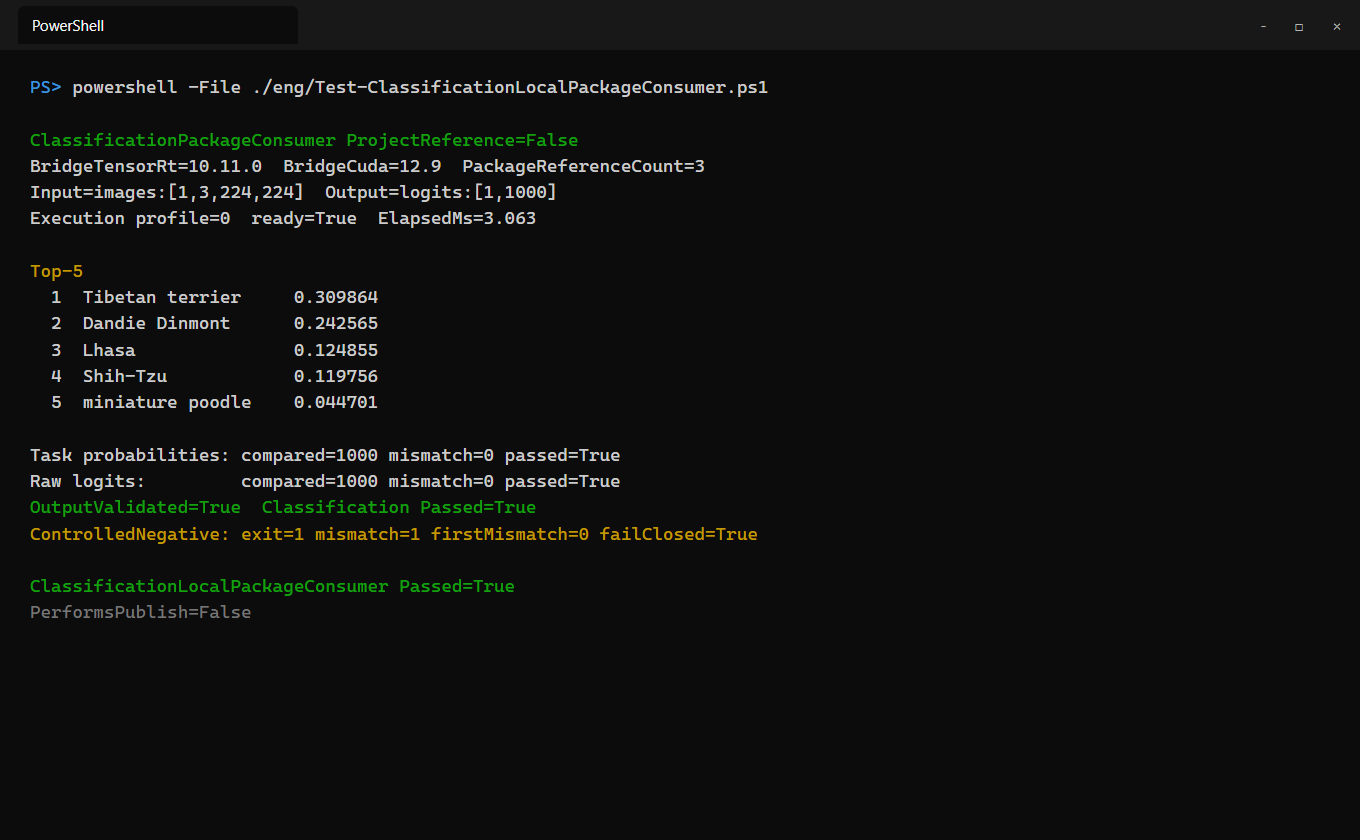
终端截图来自真实运行的 stdout,只移除了机器路径并压缩成长短适合窗口展示的字段;shape、耗时、Top-5、比较数量、负例和通过状态均未修改。结果图使用同一个 CC0 输入和同一套 Classification 可视化写入器生成。
复查与边界
复查时至少确认:
Get-FileHash (Join-Path $ModelRoot 'resnet18-imagenet1k-v1.onnx') -Algorithm SHA256
Get-FileHash $InputTensor -Algorithm SHA256
pwsh -NoProfile -ExecutionPolicy Bypass -File ./eng/Test-ClassificationLocalPackageConsumer.ps1
原始结构化结果保存在 samples/assets/classification-resnet18-local-package-consumer-runtime-evidence.json。该文件名保留发布前历史证据语义,不应改写为新的公开包证明。本文证明固定 ResNet18、固定 CC0 图片、固定预处理和 TensorRT 10.11 的推理与 fail-closed 对照;公共包的 post-publish 验证需要单独生成新的运行记录。
模型文件继续只放在外层 models 目录,不上传 GitHub;CUDA、cuDNN、TensorRT 和 NVRTC 继续由用户安装。本文内容完整不等于已授权公开发布,更不会触发包、Release 或版本发布。